

I love to paint and draw, but if I could do one thing for the rest of my life, it would be printmaking. Lithography or etching–I’ve spent hours milling over projects in joyous contentment. Block printing is the easiest to do in my home setting, though, and that’s what I’ll be sharing with you today.

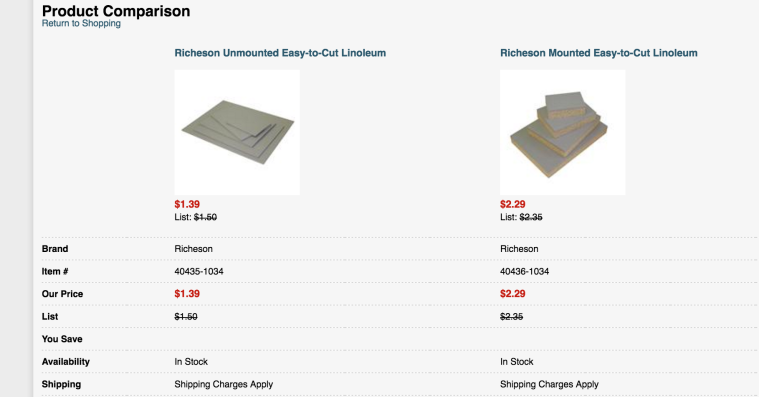
I use linoleum sheets or blocks when I block print. The sheets are less expensive than the blocks, but don’t last long after a series of prints. If I’m doing a commission or a series that I haven’t fully figured out in my sketchbook, I may use the sheets as a test-run. It isn’t impossible to use them for final pieces–I think there is a way to attach them to your own blocks, too. That isn’t in my knowledge, though. The blocks are a lot easier to carve into, and they will last passed your initial series of prints. Of course, you’re paying for that stability.
I bought my stash a few years ago from Utrecht. Here’s a recent side-by-side of the two. It refers to the sheets as ‘unmounted’ and the blocks as ‘mounted’. The difference isn’t staggering with the price, and in bulk, the difference only ends up about $3.00.
Now to the process!!
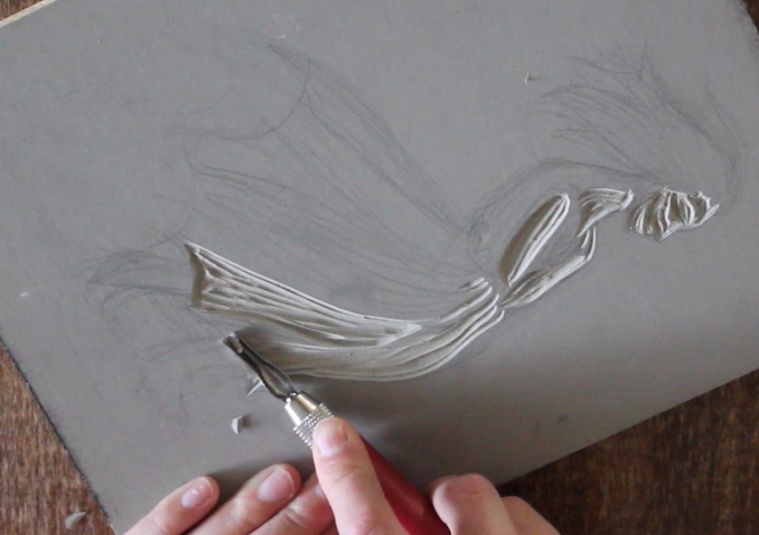
 I always start with a sketch that I’ve inked in black. With block printing, you have to think backwards. So I try to have all my whites and blacks set-in before I start the permanent process of carving out the linoleum block. It saves a lot of time, money, and your wrist to have a solid sketch before you start. Like with sewing: measure twice, cut once (or in this case, color twice, carve once?).
Even when I sketch my picture onto my linoleum block, I shade in the parts I don’t want to carve. This reminds me not to touch those parts. Every bit helps so you don’t have to start over.

 My carving tool of choice is this Speedball carver. It comes with 5 different tips, but I mostly use the three pictured here. It’s very easy to change out the tips, and you don’t have to have several tools lying about. They all fit into the hollow handle–so it’s easy storage, and super light! I bought mine at an art store up north, but I know Michael’s Craft Store and Hobby Lobby have some in stock, too. It’s fairly standard for art supplies stores, so I’m sure you can find one!
When I start to carve, I start with my thinner tips to outline details I want to keep, such as the mouth and eyes on the face.


Continue that until everything is carved!

For inking you’ll need a roller (or brayer), baren (or wooden spoon), and some ~fancy~ paper. I have two brayers: one hard and one soft. I prefer the way the soft brayer puts the ink on the block–you can mess around and see which fits your needs better. I did go and buy a real baren for my printmaking kit, but the back of a wooden spoon does the job just right, too. I like how I’m able to exert pressure with this tool rather than a spoon.

Now, there’s a lot of printmaking paper out there. Many textures and colors. Depending on your project or personal preferences will decide on what paper you choose. After a lot of messing around, I found this rice paper very cheap at Hobby Lobby. One side it slick, the other is heavily textured. I use the slick side for my prints. I really like how the ink settles on top of this paper and doesn’t move around.
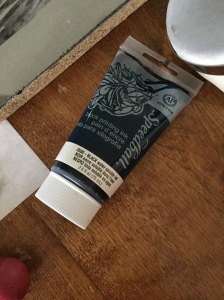 For ink, I use Speedball’s water soluble block printing ink. I wouldn’t use this near food, but it’s definitely safer to use than an oil-based ink. Since my studio at the moment is the kitchen table, this is a must-have. Also, it’s super easy to clean up! Dish soap and water.
First thing to do when getting ready to ink a block print is to make sure the block and your area is clear. I have a sheet of plastic to set my ink on and use a flat drawing board to minimize the space I need to clean up. And my mom appreciates me not getting ink on her table.


Try as you might, you may still end up like me and have something on your print that messes up a clean finish. I have a plastic palette knife I use to clean off stuff such as this.
For a full step-by-step of the process, please check out the video I did for this project!
Something I’d do differently the next time I do a block print is not have a large area to be inked–it was very difficult keep enough ink on the linoleum for a completely black space in front of the woman. Adding some texture to the black area would probably help the ink hold onto the medium better.
And that’s that! Thank you for reading my blog post, and if you have any questions about the materials or the process, please comment below! I’d love to help!
Love and hugs!

Wait so you shade in parts you don’t want to ink? Wow, that’s really cool haha but I know I’d mess up a lot! Seeing your process is really fascinating and I really love seeing other people’s works. What other kinds of art do you do?
LikeLiked by 1 person
I shade the same parts that are in the sketch, and I don’t carve them out. So they are the inked part in the end!
Thank you! I learned acrylic and oil painting in college, with printmaking secondary. Other mediums I use (watercolor, colored pencil, markers), I know to certain degrees. I dabble in digital art, but hold no real skill in it
LikeLiked by 1 person
Digital art is frustrating for me but I admire those who can do it.
Acrylics are fun.
LikeLiked by 1 person
Ditto. What digital artists are able to produce is super amazing!
LikeLiked by 1 person
I tried to get into it but I never improved more than being able to make lines without the shakiness rofl. Color is very difficult on that and you have all those layers *shudders*
LikeLiked by 1 person
Yeah–some programs, if you figure out how to use the, take away that shake (like Illustrator). When I use digital programs, I generally do a base of traditional art, scan/photo in, and then change it digitally. Otherwise, from scratch, I just don’t know what I’m doing!!
LikeLiked by 1 person
Haha have you tried experimenting then?
LikeLiked by 1 person
Actually the cover to my most recent short story webcomic had been digitally altered: http://alkahest.smackjeeves.com/comics/2254886/cover/ I laid down flat colors with copics, then added depth with the gradient tool in Photoshop. (I don’t have enough markers to get the affect I want). It’s simple. Nothing too dramatic.
LikeLiked by 1 person
Whoa that is soooooo cool!!!
LikeLiked by 1 person
Thanks! (yay for praise on minimal skillz! xD)
LikeLike
OOO that makes more sense haha I was going omg how does she make them perfect without messing up? Still, that’s really cool and thanks for sharing! I hope to see more of your art posts!!
How long have you been doing this?
LikeLiked by 1 person
Sorry, the reply lost a bit of info, so I sent it again!
I’ve been printmaking for about 5 years, I’d say. Mostly etching in school, which deals with acids. But I don’t have the facility at home to do that, so next option is block printing!
LikeLiked by 1 person
Don’t worry XD
5 years? Whoa that’s awesome!!! :0
If you don’t mind, how did you get into block printing?
LikeLiked by 1 person
It was one of the assignments in my beginning printmaking class.
LikeLiked by 1 person